Steamed milk is a staple when it comes to a variety of coffee-based beverages.
If you head out to your local coffee shop, chances are, you’ll see the barista steaming milk for the majority of orders, with the hissing sound of the steam one being one of the sounds most commonly associated with coffee and a variety of other hot, milk-based drinks.
If you want to create barista-quality coffee at home, learning to steam milk can help you to achieve your goal. Here’s a guide that should help to get you started.
Table of Contents
What Drinks Use Frothed Milk?
Knowing how to steam milk is a useful skill if you enjoy drinks that incorporate steamed milk in their recipe.
A wide variety of coffees, hot chocolates, and other hot drinks require milk froth in their creation. The most popular are the espresso drink variety including lattes, cappuccinos, and mochas.
- Latte - the coffee latte is composed of a single or double shot of espresso, paired with steamed milk. The ratio for espresso to steamed milk is roughly 1-to-2. It is finished with a light layer of milk foam.
- Cappuccino - a cappuccino comprises one or two shots of espresso, a layer of steamed milk, and a layer of milk foam. The ratio is usually 1-1-1.
- Mocha - café mocha is similar to the latte, in that it contains espresso, steamed milk and a layer of milk foam. However, the barista will also add melted chocolate to the drink for a velvety, chocolatey taste.
Steamed Milk vs. Foamed Milk
The primary difference between steamed milk and foamed milk is the amount of air introduced into the liquid. Steamed milk contains small bubbles of air; foamed milk contains a larger quantity of air, which produces a thicker foam on top.
Another difference between foamed and steamed milk is the temperature.
The primary difference between steamed milk and foamed milk is that one is heated to 120-140F and the other is heated to 160-180F. At 120-140F, most of the proteins in the milk (including casein) are not denatured, and so they retain their structure and viscosity. This allows them to suspend the air bubbles present in steamed milk.
At 160-180F, most of the proteins have been denatured, and the viscosity of the liquid has decreased. In addition, some of the fat has melted out of the solution. This means that it doesn't hold air bubbles as well.
As a result, when you add a frothing device (like a steam wand) to foamed milk, it forms a more "foamy" structure than steamed milk does.
Steamed Milk
Steamed milk is created by using the steam arm that forms part of an espresso machine.
The steam wand slowly breaks down the fats in the milk, creating tiny microbubbles referred to as “micro foam”.
It is heavy and dense - significantly heavier and denser than frothed milk - and has a silky smooth texture to complement any espresso based drink.
Foamed Milk
Foamed milk takes the form of a smooth foam.
It is created when air is introduced to milk while you steam it. In comparison to steamed milk, it is dry, less watery and can hold its shape well.
It contains plenty of bubbles, which makes it soft and light. Most commonly, foamed milk will sit on top of hot beverages, such as an espresso drink or cappuccino, and is commonly used to create latte art.
How Do I Steam Milk?
If you’ve seen baristas steaming milk while creating your favorite drinks in your local coffee shop, you may be wondering how to steam milk at home.
The good news is that it is possible to steam milk at home, but you may either have to invest in equipment for the task, or go through a process of trial and error that will allow you to steam milk well with appliances you already have.
Here are three different steaming methods that you might like to try out.
1. Steaming Milk Using Your Microwave
Most households have a microwave, so this method is good for those who want to steam milk with minimal expenditure.
Different microwaves use different amounts of power, so you may have to try this method a few times before figuring out how long you need to leave your milk in the appliance. The good news is that once you get your method down, you can repeat it every time you need steamed milk.
You will need:
- A microwave
- A microwave-safe container
- A thermometer
- A frother
Instructions:
- Pour your milk into your microwave-safe container. This can be a mug, bowl or anything else suitable you have at hand. You should use roughly half a cup of milk for each cup of beverage you’re making, as the milk will expand in size when frothed.
- Heat the milk on full power for 20-30 seconds. Keep an eye on it as it heats, as you don’t want it to overflow.
- Take your milk out and measure the temperature using your thermometer. You want the milk to be roughly 150°F. If the milk is cooler, place it back in the microwave and heat further until it reaches the desired temperature.
- Carefully use your frother to whip up the milk. This will create an extra layer of foam, perfect for your beverage. Your milk is now ready to create your drink of choice.
2. Steaming Milk on Your Stovetop
A second option that you probably already have the appliances and tools for is steaming your milk on your stovetop.
This is a method that provides you with more steady control over the temperature of your milk.
You will need:
- A stove
- A saucepan or milk pan
- A wooden spoon
- A thermometer
- A frother
Instructions:
- Turn your stove on to a low-medium heat.
- Pour your milk into a saucepan or milk pan and place it on your stovetop.
- Place your thermometer in the milk. This will allow you to monitor the temperature, giving you the opportunity to remove your milk from the heat as soon as it hits 150°F.
- Stir your milk continuously using your wooden spoon. Milk can scald easily, especially if you’re using small amounts. Consistent stirring can prevent this.
- Remove your milk from the stovetop as soon as it reaches 150°F. This usually takes between three and four minutes.
- Use your frother to whip up your milk, creating a warm, bubbly layer on top. Your milk is now ready to use in your drink!
3. Steaming Your Milk Using a Steam Wand
If you’re open to investing in this process, you can buy an espresso machine with a steam wand or a stovetop steam wand.
This will provide the best results and can even allow you to start practicing foam art for your drinks.
There are a variety of options to suit different budgets and will be well worth the investment if you regularly drink beverages that require steamed milk.
You will need:
- A steam wand
- A metallic milk jug
- A thermometer
Instructions:
- Start out by pouring your milk into the metallic milk jug designed for steaming. It’s generally recommended that you don’t allow the milk to just under the v of the jug, as this will prevent it from overflowing.
- Your steam wand will have come with instructions for use. Prepare your steam wand, allowing it to heat up.
- Place the steam wand tip just below the surface of the milk. The steaming wand will begin to pull air into the milk, creating a hissing sound. This process is preferred to as “stretching the milk” and doesn’t take long - roughly 5 seconds. You will notice that the fat in milk will begin to expand, creating foam.
- Move the steam wand further below the surface of the frothy milk - roughly 1/5 of an inch in. Tilt the jug slightly until you see the milk beginning to swirl, creating a whirlpool formation. This will incorporate the bubbles into the rest of the milk, resulting in a creamy texture.
- When your milk reaches 150°F, remove the steam wand. Tap the jug gently to dissipate small bubbles and give the frothy milk one final swirl. It’s now ready for you to use.
These are three of the most popular methods when it comes to milk steaming at home.
Hopefully, at least one will meet your needs and become your go-to when you fancy whipping up a latte, cappuccino, mocha or other beverages with a base of steamed milk.
What is the Best Milk to Steam?
Which is the best milk to steam?
Whole milk, skim milk, soy milk, and oat milk are all suitable choices for steaming. However, the best option for steaming is whole milk.
Whole Milk
Whole milk has a higher fat content than skim or low fat milk, which makes it easier to steam. You'll be able to create more volume and better texture with full-fat cow's milk than with any other type of milk, including nut milks.
A high fat content helps you get that silky texture you want in your espresso.
But once you've steamed your milk, those extra calories add up quickly.
One 12-ounce cup of steamed whole milk has about 150 calories, 14 grams of fat, and 8 grams of saturated fat. That's compared to 80 calories, 2.5 grams of fat, and 1 gram of saturated fat in unsweetened almond milk.
2% Milk
Whole milk contains the most fat, which means it has the best texture for steaming.
Unfortunately, this means that whole milk also develops thick foam that can be difficult to pour into your espresso drink (and it's not great for your waistline either).
That's why many people turn to 2% milk instead, as it still has enough fat to produce a rich, velvety microfoam when steamed (about 9.5% fat), but not so much that it leaves the drink tasting too heavy or greasy and isn't quite so thick or heavy.
Skim Milk
While skim milk is great for general nutrition, it doesn't always produce the best results when it comes to espresso and latte-making.
This is because skim milk is deficient in lipids (fats) and proteins — both of which are important for creating an ideal froth.
Skim milk will still foam, but the foam will be thinner and more fragile than the foam obtained from whole or 2% milk.
It will also have less body and texture. This makes it more difficult to froth into desirable patterns and designs.
Soy Milk
Soy milk was actually one of the original non-dairy kinds of milk developed and is the easiest to steam.
It’s also the most popular non-dairy milk in bar cafes, so it’s readily available at most coffee shops.
Soy milk is thinner than cow’s milk and lacks the fat needed for a good foam for cappuccinos.
Because of this, you may want to stick with oat or almond milk if you’re looking for the best substitute for cow’s milk on a cappuccino or latte.
However, soy can still produce a decent foam if you want to use it on an espresso macchiato or any other drink that uses just a little bit of foam.
Oat Milk
Oat milk is the best plant-based milk for steaming and foaming, but it does have some drawbacks.
It has a creamy mouthfeel and good foam stability that makes it a great alternative to cow’s milk. Oat milk can be used in all the same applications as cow’s milk, from cappuccinos to lattes, to chai tea.
Oatly makes a very popular oat milk specifically formulated for baristas. It's available in shelf-stable cartons or shelf-stable bags (for espresso machines with built-in steamers).
Almond Milk
If you are looking for something that tastes good but also looks good in your cup, almond milk is a great choice!
In my experience, almond milk is the best milk to steam or froth for an espresso. I prefer the taste of almond milk, and it seems to have a higher fat content than other types of non-dairy milk. It also foams up surprisingly well compared to other non-dairy kinds of milk.
One of the most important things to understand about almond milk is that not all varieties are created equal. The best almond milk will have just two ingredients: water and almonds.
Stay away from brands that add sugar or thickeners like carrageenan and xantham gum — these ingredients can affect flavor and make the milk more difficult to steam.
Coconut Milk
The best dairy-free option for steaming or frothing is coconut milk due to its high-fat content.
Shoot for coconut milk in the carton to produce excellent microfoam that can be used for latte art, just like regular dairy products.
Bottom line, all types of milk will certainly produce a quality froth, so it's really down to personal preference in terms of taste and texture.
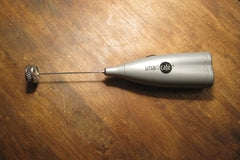
What is the Best Milk Frother?
There are a few different types of milk frothers on the market:
- motorized whippers/heaters (such as the Aeroccino)
- battery-powered wands
- Those that resemble French press units
Each has benefits and drawbacks like cleaning, number of bits, and amount of work or care required to get the best foam and froth.
You can read more about those details in our review of the best milk frothers.
Not intersted in the finer points of milk frothers? Below are our top picks for frothing milk at home.
| Product | Type of Frother | Capacity | Price |
|
Best Overall
|
Electric | 3.9oz. | $32.99 |
|
Upgrade Pick Nespresso Aeroccino3 Milk Frother
|
Electric | 4.1oz | $98.00 |
|
Budget Pick
|
Electric | 5.1oz. | $36.99 |
|
Best Wand Frother Rösle Stainless Steel Dual Speed Frother
|
Battery Handheld | 5.1oz. | $30.95 |


The Miroco and the Aeroccino are essentially the same, but they differ in how you switch between making froth and stirring your milk:
I use my mini-whisk for quickly incorporating powdered ingredients poured into a mug of coffee, or helping break down the ridiculous "crema" that forms; it's powerful enough to overflow if there's too much liquid in the cup.
Personally, I prefer to use the Aeroccino for basic milk drinks because it's easier to hand-wash (flat lid, simpler whisk).
Bottom Line on Steaming Milk at Home
Learning how to steam milk at home is a simple process which takes nothing more than practice and patience.
With that in mind, give it your best shot, and you’ll be barista-quality in no time!

The Best Drip Coffee Maker

10 Unique Father’s Day Gift Ideas for Coffee Lovers (2024 Edition)
The Best Single-Serve Coffee Makers for a Quick Caffeine Boost
The Best Burr Coffee Grinders Reviewed

The Best Coffee Scales of 2024